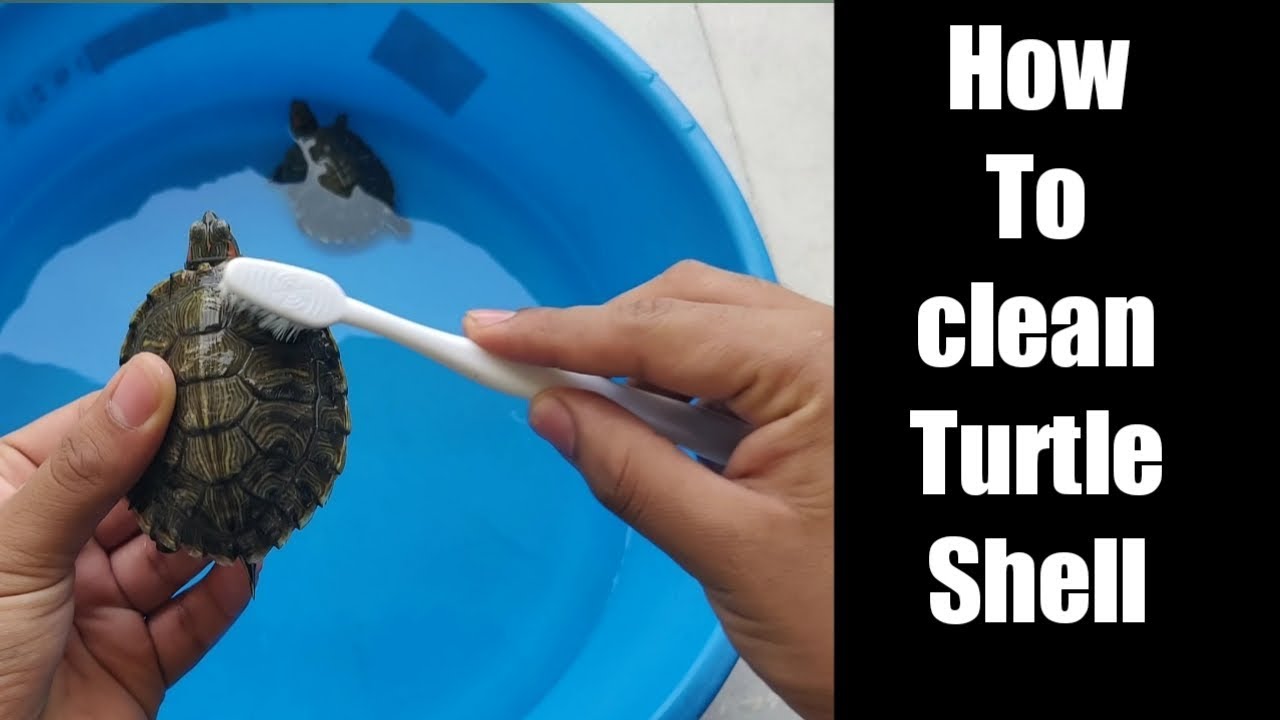
To clean your turtle’s shell, use a soft brush and lukewarm water. Avoid using soap or harsh chemicals.
Turtles are fascinating pets that require specific care to stay healthy. One essential aspect is maintaining a clean shell. A dirty shell can lead to infections and other health issues. Regular cleaning helps prevent algae buildup and bacterial growth. It’s crucial to use gentle methods to avoid damaging the shell.
A soft brush and lukewarm water are sufficient for most cleaning needs. Ensure you handle your turtle gently during the process. Keeping the shell clean not only benefits your turtle’s health but also enhances its appearance. Proper shell maintenance is an integral part of responsible turtle care.
Turtle Shell Care
Taking care of a turtle’s shell is crucial for its health. A clean shell prevents infections and diseases. Regular cleaning helps your turtle stay happy and healthy.
Importance Of A Clean Shell
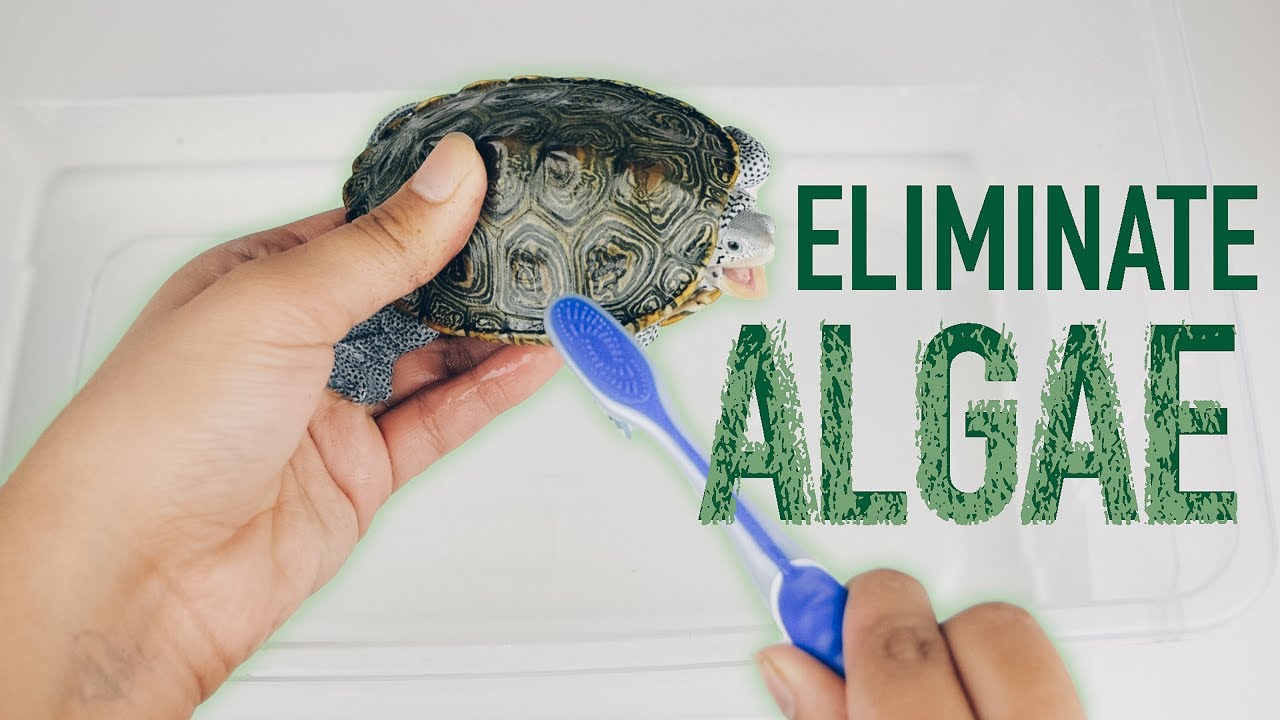
A clean shell is vital for your turtle’s well-being. It helps to prevent algae buildup and bacterial infections. Turtles with clean shells are more active and live longer.
Dirty shells can lead to shell rot, a serious condition. It is painful for turtles and requires medical attention. Keeping the shell clean prevents such issues.
| Benefits | Details |
|---|---|
| Prevents Infections | Reduces the risk of bacterial and fungal infections. |
| Improves Appearance | Makes your turtle look vibrant and healthy. |
| Enhances Activity | Encourages your turtle to be more active. |
Signs Of An Unclean Shell
Look for these signs to know if your turtle’s shell is dirty:
- Green or brown algae on the shell.
- Unpleasant smell coming from the shell.
- Soft or discolored spots on the shell.
- Visible cracks or pits on the shell.
If you see any of these signs, it’s time to clean the shell. Use gentle methods to avoid harming your turtle.
Regular shell inspection helps catch problems early. This ensures your turtle stays healthy and happy.

Recognizing Shell Health Issues
Knowing your turtle’s shell health is vital. Spotting issues early can save your pet. Regular checks help detect problems before they worsen.
Common Turtle Shell Problems
Several problems can affect your turtle’s shell. Some are more common than others.
- Shell Rot: This is a bacterial or fungal infection. It causes soft spots or a bad smell.
- Pyramiding: This is a sign of poor diet or habitat. The shell grows unevenly.
- Algae Growth: Green patches on the shell. This can be normal but needs monitoring.
- Cracks or Injuries: These can result from falls or bites. They need immediate attention.
When To Seek Veterinary Care
Some shell issues need a vet’s help. Always consult a vet for severe cases.
- If your turtle’s shell has deep cracks or bleeding.
- If you notice bad smells or soft spots on the shell.
- If your turtle shows signs of pain or discomfort.
- If there’s excessive algae that doesn’t clean off easily.
Taking care of your turtle’s shell is essential. A healthy shell means a happy turtle.
Pre-cleaning Preparations
Before cleaning your turtle’s shell, proper preparations are essential. This ensures a smooth and stress-free experience for both you and your turtle. Let’s explore the steps in detail under the following subheadings.
Gathering Necessary Supplies
To start, gather all the necessary supplies. This will help make the cleaning process efficient. Here’s a list of items you will need:
- Soft-bristled toothbrush
- Warm water
- Non-toxic soap (optional)
- Towel or soft cloth
- Gloves (optional, for your protection)
Having these items ready will make the cleaning process easier and faster.
Creating A Safe Cleaning Environment
Next, create a safe environment for your turtle. This reduces stress and ensures safety. Follow these steps to set up the area:
- Choose a quiet place away from distractions.
- Use a large, shallow container to hold your turtle.
- Line the container with a towel for added comfort.
- Ensure proper lighting but avoid direct sunlight.
This setup will help your turtle feel secure and calm during the cleaning process.
With these preparations, you are now ready to clean your turtle’s shell effectively.
The Cleaning Process
Keeping your turtle’s shell clean is crucial for its health. A clean shell helps prevent infections and keeps your turtle happy. Let’s dive into the cleaning process to ensure your turtle’s shell is spotless and healthy.
Gentle Washing Techniques
Start by filling a basin with lukewarm water. Make sure the water is not too hot or too cold. Place your turtle in the water gently. Use a soft toothbrush to scrub the shell lightly. Move the brush in small, circular motions. Avoid scrubbing too hard to prevent damage to the shell. Rinse the shell with clean water after scrubbing.
Safe Soaps And Solutions
Use only mild soaps or solutions for cleaning. Do not use harsh chemicals or detergents. Look for reptile-safe soaps available at pet stores. Mix a small amount of the soap in the water. Gently scrub the shell with the soapy water. Rinse thoroughly to remove all soap residue. Ensure no soap is left on the shell to avoid skin irritation.
Rinsing And Drying Techniques
Cleaning your turtle’s shell is a key part of its care. Proper rinsing and drying are essential steps to ensure your turtle stays healthy.
Proper Rinsing Methods
Gently lift your turtle from its habitat. Use a bowl with lukewarm water. Avoid using hot or cold water. Hold your turtle carefully and dip its shell in water.
Use a soft brush to clean the shell. Do not use soap or any chemicals. Brush gently in a circular motion. Clean all areas of the shell, including the edges.
After brushing, rinse the shell with clean water. Make sure all dirt is removed. Check for any leftover debris. Repeat the process if needed.
Ensuring Thorough Drying
After rinsing, place your turtle on a clean towel. Gently pat the shell dry with the towel. Make sure to dry all parts of the shell. Pay attention to the edges and underneath.
Allow your turtle to air dry for a few minutes. Place it in a warm, dry area. Ensure there is no direct sunlight. Avoid using a hairdryer or any heat source.
Check the shell for any moisture before returning your turtle to its habitat. A dry shell prevents fungal and bacterial growth.
Shell Conditioning Aftercare
Maintaining your turtle’s shell goes beyond just cleaning it. Proper shell conditioning aftercare is crucial for your turtle’s health. This ensures the shell remains strong and free of damage or infection. Below, discover effective shell conditioning techniques.
Applying Shell Conditioners
Shell conditioners are essential for maintaining a turtle’s shell health. They help in keeping the shell moist and free from cracks.
To apply a shell conditioner, follow these steps:
- Choose a high-quality turtle shell conditioner from a pet store.
- Ensure your turtle’s shell is dry before application.
- Apply a small amount of the conditioner to a clean cloth.
- Gently rub the conditioner onto the shell, covering all areas.
- Let the shell dry for a few minutes before placing the turtle back in its habitat.
Natural Alternatives For Shell Care
If you prefer natural methods, several options are available. These alternatives can be as effective as commercial conditioners.
Consider these natural shell care methods:
- Olive Oil: Lightly rub a few drops on the shell. This keeps it moisturized.
- Aloe Vera Gel: Apply a thin layer to soothe and protect the shell.
- Coconut Oil: Use sparingly to maintain shell shine and health.
Using these natural alternatives can be beneficial. They provide necessary moisture and protection without harsh chemicals.
Maintaining A Healthy Shell
Keeping your turtle’s shell healthy is crucial for its overall well-being. A healthy shell protects your turtle from infections and injuries. This section will guide you on how to maintain a healthy shell for your pet turtle.
Dietary Considerations
Feeding your turtle a balanced diet is essential. Nutrients like calcium and vitamin D3 are crucial for shell health. Include leafy greens, commercial turtle food, and occasional protein sources.
- Leafy greens: Kale, dandelion greens, and collard greens.
- Commercial turtle food: Choose high-quality brands.
- Protein sources: Insects, small fish, and cooked meat.
Ensure your turtle gets enough calcium. You can use a calcium supplement or provide cuttlebone.
Optimizing The Living Environment
A clean, spacious tank is vital. Ensure the water is clean and changed regularly. Turtles need a basking area with a UVB light. This helps them synthesize vitamin D3.
| Item | Purpose |
|---|---|
| Clean water | Prevents shell infections |
| Basking area | Allows for drying and UVB exposure |
| UVB light | Helps in calcium absorption |
Maintain the tank temperature. Water should be around 75-80°F. The basking area should be 85-90°F.
- Check water quality weekly.
- Replace UVB bulbs every 6-12 months.
- Clean the tank and accessories regularly.
Provide hiding spots and smooth surfaces. This helps prevent shell damage.

Frequent Mistakes To Avoid
Cleaning your turtle’s shell is important. But, many make mistakes. These mistakes can harm your turtle. Here are common errors to avoid.
Overcleaning And Harsh Chemicals
Overcleaning is a big mistake. Turtles need some natural bacteria. Cleaning too much removes this bacteria. Use gentle methods instead.
Harsh chemicals can harm your turtle. Avoid strong soaps and cleaners. Use mild soap and warm water only. Make sure to rinse well after cleaning.
Neglecting Regular Check-ups
Regular check-ups are crucial. Many forget this step. Check your turtle’s shell weekly. Look for cracks, chips, or discoloration.
Regular check-ups help you spot problems early. Early detection can save your turtle from serious issues. Make this a part of your routine.
| Mistake | Why It’s Harmful |
|---|---|
| Overcleaning | Removes natural bacteria |
| Harsh Chemicals | Can harm the turtle’s shell |
| Neglecting Check-ups | Misses early signs of problems |
Interactive Care: Engaging Your Turtle During Cleaning
Cleaning your turtle’s shell can be more than just a chore. It offers a unique chance to bond with your pet. Interactive care helps keep your turtle healthy and happy. Engaging your turtle during cleaning can make the process enjoyable for both of you.
Bonding Through Cleaning
Bonding during cleaning strengthens your connection with your turtle. Use gentle movements to avoid scaring your pet. Speak softly to reassure them. Offer treats as rewards for calm behavior.
- Use a soft toothbrush for cleaning.
- Gently scrub the shell in circular motions.
- Rinse with lukewarm water.
Make sure the water is not too hot or cold. Consistency in this routine builds trust between you and your turtle. Over time, your turtle will look forward to these sessions.
Monitoring Your Turtle’s Behavior
While cleaning, always observe your turtle’s behavior. Look for signs of stress, like rapid breathing or trying to hide. If you notice these signs, take a break and let your turtle calm down.
Use a table to keep track of your turtle’s responses:
| Behavior | Action |
|---|---|
| Calm and still | Continue cleaning |
| Rapid breathing | Pause and comfort |
| Hiding | Stop and try later |
Interactive care is not just about cleaning. It’s about understanding and responding to your turtle’s needs. This helps in building a strong, trusting relationship.
Advanced Shell Care Tips
Ensuring your turtle’s shell stays healthy is crucial. Beyond basic cleaning, advanced care methods can keep the shell in top condition. These tips help prevent issues like shell rot and ensure proper shedding.
Dealing With Shell Rot
Shell rot can be a serious issue for turtles. It often appears as soft spots or discolored patches on the shell.
- Inspect Regularly: Check your turtle’s shell weekly for any signs of rot.
- Keep it Dry: Ensure the basking area is dry and warm.
- Proper Hygiene: Clean the tank and change the water frequently.
- Topical Treatments: Use antibacterial ointments if you notice signs of rot.
Consult a Vet: If shell rot persists, consult a vet. They can provide professional treatment.
Understanding Shell Shedding
Turtles shed their shells naturally. Proper shedding is important for shell health.
- Healthy Diet: Ensure a balanced diet rich in calcium and vitamins.
- UVB Lighting: Provide UVB light to help with the shedding process.
- Regular Baths: Bathe your turtle in lukewarm water to aid shedding.
- Avoid Picking: Do not peel off shedding scutes. Let them fall off naturally.
Monitor Shedding: Keep an eye on the shedding process. If shedding is abnormal, consult a vet.
Following these advanced shell care tips will ensure your turtle’s shell remains healthy and strong.
Frequently Asked Questions
Can I Use Dawn Dish Soap To Clean My Turtle Tank?
No, never use Dawn dish soap to clean a turtle tank. It can harm your turtle. Use reptile-safe cleaners instead.
Can I Use Dawn To Clean My Turtle Shell?
No, it’s not safe to use Dawn on turtle shells. Use a gentle, reptile-safe cleaner instead.
Can You Clean A Turtle Shell With Alcohol?
No, never use alcohol to clean a turtle shell. It can harm the shell and irritate the turtle’s skin. Use warm water and a soft brush instead.
Is It Ok To Brush A Turtle Shell?
Yes, you can gently brush a turtle shell. Use a soft-bristled brush and avoid harsh chemicals.
Conclusion
Regularly cleaning your turtle’s shell is essential for its health. Use gentle methods and appropriate tools for best results. Always monitor your turtle for signs of stress during cleaning. A clean shell promotes overall well-being and prevents infections. Keep your pet happy and healthy with these simple cleaning tips.


Leave a Reply